Friday, August 31, 2018

Praise Interference

I created a black 5X5 canvas with Black Gesso with the intention of using a window stencil and make it look like stained glass from the outside looking in. I first painted the glass with paint, but then later decided it would look better with the Deco Art Interference paints because they are designed to work on black. I also used several types of texture including modeling paste, glass beads and embossing paste.


The window came out pretty good in the end. Love how the interference paints shimmer in the light. I created a YouTube Video showing my process start to finish. I thought since I am going to a craft show at a Catholic Church in October, something like this might actually sell.

here is my video, short and sweet:
Mixed Media - Praise


Product List:

Window stencil by Shawn Petite
Liquitex professional Matte Medium, Gesso, gloss medium, glass beads, modeling paste
Dreamerweaver embossing paste white & transluscent
Deco Art acrylic paints and fluid acrylics interference paints

Thanks for stopping by, leave me a comment so I knew you were here.

Wednesday, August 29, 2018

Welcome Friend

Yesterday's message of the day was about how important friends are.

"if you have nothing in life but a good friend, you are rich"


For me, a true friend is one who can keep me grounded, and I have one of those.

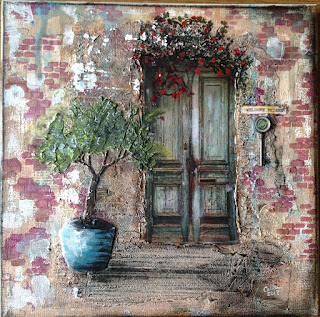
I knew I wanted to work on a painting and decided to use one of the printed vintage doors that I have been holding onto. I wanted to alter it some, because I don't want to copy someone else's work, but perhaps just use some techniques. So I made this 12x12 canvas with lots of beach sand and crackle paste.


Here is my video on YouTube:

Mixed Media Welcome Friends


Thanks for stopping by, leave me a note, so I know you were here.


As promised, my products list.
Deco Art Acrylic Paints
Liquitex Gesso, Matte Medium and Glazing medium
Stencils by Shawn Petite
Charcoal Pencil
white uniball pen
Blick soft pastels
Daler & Rowney Artist Ink
Spellbinders embossing folder
Dreamweaver embossing paste
Ranger crackle paste

Monday, August 27, 2018

A little color in my life

The last few days I have looked at my work and wondered why everything is so very dark.. Was I in a dark place? Or is the grungy, brown and black colorless paintings just my style? As I was taking a pan pastels class with Donna Downey I starting making abstract poppies. I love poppies, they are so colorful, in fact, I love wild flowers. Why not do a painting of wild flowers? That would be bright and cheery and bring some color in to my drab existence. As I look down at my brown clothing? What?

The other morning after I finished cleaning my house and doing laundry I sat down to watch a Sunday Inspiration Video by Shawn Petite. It was a calm painting, also in browns and whites and blacks, but it was not the painting but the message that followed. She said she has an app that gives her daily inspirational quotes. I just started my words journal yesterday, so I thought I would search for an app that could help me with that.

Another topic she talked about was that the best way to become good at being a mixed media artist is to practice every day, every minute. I have felt somewhat guilty about the amount of time I spend doing art, even though I love it. So this message reaffirmed my art and gave me permission to live and breathe it without guilt.

When I sat down to breakfast I found an app that I wanted and installed in on my new phone. Then I looked at current quotes they had on the app and what to my wandering eyes does appear? A quote about dreams in a field of wildflowers. Fortuitous. I knew what I had to do.


And of course, I video taped it I had a lot of other activities going on so I did not get it posted for a few days. But here she is in living color:

YOUTUBE: Mixed Media - Dreams


As promised, my products list.
Deco Art Acrylic Paints
Liquitex Gesso, Matte Medium and Glazing medium
Stencils by Shawn Petite
Charcoal Pencil
White China pen, white uniball pen
Blick soft pastels

Thursday, August 23, 2018

Word Journal - Page 1

There are only so many hours in a day and I find that those hours continue to zoom by like minutes. I don't understand how people who have jobs or raise kids or both, find the time to do any of this. I am a stay-at-home grandma without responsibilities. I try to get through on-line classes and videos, document my daily, check in on Facebook groups, create mixed media, make and edit videos and update my blog. That pretty much eats up all my hours, which, like I said, seems more like minutes.

Today I decided to create a little art journal. I have so many little notebooks that I bought for travelers notebook documentation, but that has, like most of my previous passions, gone by the way-side; not really gone, just back-burnered. Not a nicher, never have been, probably never will. Too much life, so little time.

I have watched a lot of "crash the stash" and other types of art journal videos and decided I really need to get into my own stash of both stuff and product. Lately I have been using basically the same products and my water colors, oxides, alphas, stamps, inks and other media has been overlooked. Scrapbook paper, journal cards, die cuts and tons of ephemera are everywhere, and I really need to use it somehow.

My little Words Journal is intended to be some encouragement every time I create in it. It should be a collection of words of wisdom or quotes that I find that inspire me to enjoy myself, feel productive, content and happy.

here is the video on YouTube:
Word Journal - Be Happy


So many ideas spinning in my head, maybe I do need a plan afterall…

Product List:

Distress Oxides
Zig Real Color pens
Micron Pen
Versafine Onyx Black
Archival Jet Black
Stencil by Shawn Petite
Wooden stamp blocks by Stampabilities and studio G.

Monday, August 20, 2018

Owls In The Dark

I created a fun canvas today using black gesso and a moon mask. I also stamped two Art Impressions owls, colored with copic markers and cut them out. The tree also was fussy cut.


I have been craving cooler temperatures lately and these types of projects help get me there. I did see we may get as low as 70 degrees on Thursday Night. That will be glorious if it happens.


The video is on YouTube.
Mixed Media Owls in the Dark 8-20-18


I was able to get this all done in the same day. I am improving.


This quote, for me, would be morning dark, not night dark. My creativity starts before the sun rises and dies way before it sets.

Product List:

Liquitex professional Matte Medium, black Gesso
Deco Art acrylic paints and fluid acrylics
Charcoal Pencil - General
Art Impressions stamp - owls
Copic Markers - assorted colors
Aleene's Tack it over & over
Zig writer by Kuretake

Thursday, August 16, 2018

Paper Napkin Christmas Cards

Recently at one of my Art Journal/Mixed Media club meetings we used colorful paper napkins on our art. This inspired me to try the technique using holiday prints on Christmas Cards. I started my Christmas cards really early this year. I have already made 45 cards on my way to 65. Now that is a head start!

The process for making these cards is pretty simple.

I cut my card stock to a standard A2 5 1/2 x 4 1/4 then covered it with glue stick. The paper napkin needs to be separated down to a single layer. All napkins have at least one extra layer, while others have two. Lay the paper on the back side of the napkins and burnish it in.

You can stop there if you want or you can add a layer of shimmer with some clear pigment ink and embossing powder. I remembered I had bought an Archival Opalite ink pad years ago and had put away in a drawer. It is a reflective interference ink, coincidently, I just purchased an entire line of the interference acrylics because I love their reactive properties.


For some added texture I ran the card through my cuttlebug in an embossing folder too. So many options.

You can watch the video on YouTube here: Paper Napkin Christmas Cards


and listen to a little Christmas music too.
Product List:
Opalite Pigment Ink by Tsukineko
Judikins Clear embossing powder
Cricut Cuttlebug die cutter and embossing folders
Nicole Heat Tool

Tuesday, August 14, 2018

Live Simply

I was reminded by a couple of Facebook posts that Autumn is on the horizon. I do love the fall season; here in the low country it starts when the kids go back to school and most of the tourists go home. That is when we get our beaches and roads back. Although the weather still says "summer" it is the beginning of autumn.

My younger sister lives in Florida, for her autumn never really comes. It is hot and hot and flat and boring. Adding insult to injury when the official summer season ends in Florida all the millions of snowbirds come back and crowd her beaches and roads. It is a lose-lose situation for full time Floridians. My older sister lives in Iowa. She has no tourists, except the ones who get lost on their way to the middle of nowhere. The summers can be unbearably hot there too without any sea breezes, that and a constant threat of tornadoes, no thanks. When autumn comes, so does winter; and winters are BAD. They are both happy with their choice of homes and that is all that matters. Me? I gladly tolerate my few months of hot and humid in order to enjoy the wonderful autumn, winter and spring in Pawleys Island.

In honor of the upcoming season I took out my box of Halloween and Thanksgiving goodies. I was thinking pumpkins. I might be having my first art exhibition the end of October. Actually, it is a craft fair, but still the first time I put my work out in public, therefore it is an exhibit. Because it will be the end of October, I know people will be in the mood for the Holidays, so I created a small canvas (5x7) with pumpkins as the focal point. I paid a pretty penny to get a booth at this craft fair, so I need to make sure I sell something to fund my coming-out party.


I stamped this Penny Black cling on watercolor paper with Ranger Archival, heat set with clear embossing powder and colored it with copic markers. I don't own a lot of copic markers, because they are very expensive, but I had the right colors to make the pumpkins. Then I fussy cut them.

For my background I adhered some colorful, autumnesque patterned papers to my canvas with matte medium. The canvas was very pretty with all the paper, but as one of my instructors says "you must be willing to let go of your background", I knew it would be short-lived.


I proceeded to cover it with brown and cream acrylic paint diluted with a gloss medium, I painted a tree trunk, branches, fence and filled in the background with trees, leaves, sky and grass. Then I adhered the pumpkins and worked them in with more paint; lastly I added a piece of dress pattern that had been stamped with a hymn music. A little shading here and there, a word sticker, some white pen highlights and it was done.


I like it. Thanks for stopping by. If you liked this write-up follow me by email, so you don't miss an episode of this life in the Back 30.

Monday, August 13, 2018

Pick a Stick Challenge

I saw a YouTube Video a few weeks ago where a friend of mine created an art journal page using a cup full of tong depressor sticks. On each stick was written a mixed media technique or medium. The objective was to use that technique/medium on your page. The sticks are drawn one at a time, 10 times. The resulting page is a masterpiece (or mess-terpiece) depending upon how everything works together (or not).

Now I love a challenge and this sounded like so much fun. Yesterday I was browsing Facebook and stumbled upon a group called "Art It Out" from there I found a YouTube Video by Crystal doing the same thing. I was unaware there were so many Pick a Stick challenges on YouTube. This particular one was done a few days ago, so I gave it a try.

The way I worked it was I would stop the video immediately after she read the stick, that would permit me to make my own creative selections without being influenced by her choices.

I video taped my process and created a 10 minute video (to music, of course) showing my steps using the 10 techniques. here is my video:
youtu.be/od8ZrrS4Uag

My Project Result:


It would have looked so much better without a final "white wash". But that is the name of the game.

For Crystal's Video: youtube.com/watch?v=m2XvnKHtWXA&t=5s

Product List:
Liquitex professional Matte Medium, Gesso and Gloss fluid
Deco Art acrylic paints
Dreamweaver embossing paste white
Liquitex heavy body Acrylic, black
Stencils: wildflower, splatters and letters
Zig writer and clean color real brush by Kuretake
Uniball white gel pen

Friday, August 10, 2018

Be Brave

I often see mixed media projects that use a woman's face as the focal point. Sometimes it is a girlish face or a cartoon-like face.

Today, I thought I would try a project with a face. But, rather than use one I found or one that I made up, I decided to use my own. This sketch was created while I looked at my own image using the computer camera. Once I had drawn it, I scanned it; I figured I could use it over and over should I ever have the desire to use a face on a project again.

This painting is on an 11X14 stretched canvas. The background was created with torn patterned paper, magnolia flowers and vines then grunged with black postmarks, numbers and words.

I used the title of "be brave" because I am not one to put my face out there or any facsimile there of. The last time I had done a self portrait was when I was a sophomore in college taking a drawing and painting class at Rensselaer Polytechnic Institute. As I recall it was not very good.

I am getting much better at editing videos. This one only took one compile. Bravo.

View on YouTube: Mixed Media Be Brave 8-9-2018


Product List:

Fine line marker - White
Liquitex professional Matte Medium, Gesso and Glazing medium
Ranger Archival Ink - jet black
Deco Art acrylic paints
Dreamweaver embossing paste white
Blick & Artist's Loft Soft Pastels
Charcoal Pencil - General
Daler & Rowney Sap Green Acrylic
Liquitex heavy body Acrylic, black
Stencils by Shawn Petite: magnolia, background words, postage 1 and vines
Zig writer by Kuretake