Sunday, September 21, 2014

Craft My Story

I registered in a year long online class to craft my story using stamps. Story Stamps.


I decided it be best to start at the beginning, my beginning documenting everything I remember first hand and other things I remember being told. I am trying to dig up photos to accompany my story. I found this photo on the Internet, I recognize the houses and know the outcome of this 1954 hurricane named Carol. It kind of marks the beginning from which everything else In my story will unfold.

Picking my brain for memories from 1/2 a century ago is exhausting. It will be amazing to see what turns up, or doesn't.

Like the surf from Carol, it's going to be a wild ride.


Tuesday, September 16, 2014

Seasoning stamps

I find the best way to season a new stamp set is to use it. Since you rarely can use an entire stamp set on one page or card the next best thing is your art journal. After all it really has no purpose other than to allow artistic freedom.

Here is today's art journal spread.

This is the stamp set I have had for a while and have not used. It is not top grade, so it takes some "seasoning" before the stamps will make good impressions. When stamping in my art journal I like to use ranger archival ink, it is a dye that does not blend with Watercolors. So your images will stay put and not bleed.

So I stamped both pages of my art journal with all the stamps from this set as well as a larger floral stamp I had not yet broken out of its pack. I loved the little star that came with this kit, can you tell?

At the same time I stamp on my journal I "stamp off" on a piece of white cardstock. These jumbled black images work great as backgrounds on future projects.

Next step is apply distress ink in rainbow colors, I saw it listed today as ROYGBIV - Red Orange Yellow Green Blue Indigo Violet.


And the same on the cardstock

After stamping and coloring it is time to embellish. I cut up a card face I planned not to use as a card, and some other word patterned cardstock, and pulled a few large die cuts from my stash. I adhered these onto the journal pages with mat medium and I was done.

Thanks for stopping by.


Friday, September 12, 2014

3 Cereal Boxes

I have had three cereal boxes sitting on the windowsill in my workshop for about a week. Today I used them. I found a YouTube video a while back that showed how to make mini albums from cereal boxes, I made one before that holds 6x6 scrap book pages. I have been using that one for the grandchildren, I wanted to make more for other scraping stuff I do including ME.


These are the five I created today. For the first I used the honey nut Cheerios box, cut the box down to 6 1/2 by 16 including the spine. I used the remainder to make a smaller 4 inch album. The second was a cinnamon toast crunch box, I made another 6 1/2 inch album and used the remainder to make a 3 1/2" mini. The last was an all bran box which was big enough to make one 6 1/2 album.

The honey nut Cheerios box is now a baby album for the baby to be.

I put two pockets inside in the same paper as the backing.


I thought these colors would be great for another album, unfortunately when I attached the backpage cover it was upside down, so I had to flip it over and apply another strip of paper. I love the black die cut.


This is the inside of the cinnamon toast crunch album.


Finally the all bran box was used to create this multi color album in fall colors.


The inside of this album has dual pockets using the same paper as the cover.


The minin minis were created using the left overs. They are so cute. Not sure what I will use them for yet.. But I will think of something.


Inside of the brown flowery album.


The inside of this album is cut outs of some coordinating papers I had in my stash.


Saturday, September 6, 2014

Mariposa

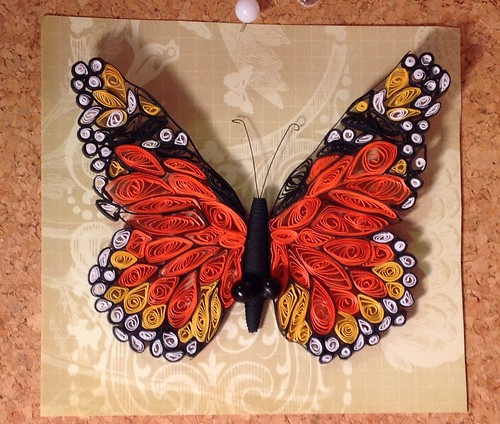
A friend of mine gave me a tube of primary color quilling strips. I watched a video on YouTube to get some training on the process and made some shapes and designs. Then I stumbled upon a video in French on how to make a butterfly, I thought her project was gorgeous. It did have English subtitles, so I figured Why not? I cut some black and white strips and printed a very large monarch from Bing images as my guide.

The printout was placed inside a plastic document protector and that pinned to a cork board.The image was very symmetrical, I am not sure nature is that exact, but I tried to build all the parts in twos in order to mirror each wing.


I had thought quilling was only for flowers. I am pleasantly surprised to find so many artistic uses for these strips of paper. I think I will mount this with a black mat and put in a white frame. Next time maybe I will do a colorful bird. But not today.