Sunday, March 30, 2014

Here a chick...loving green

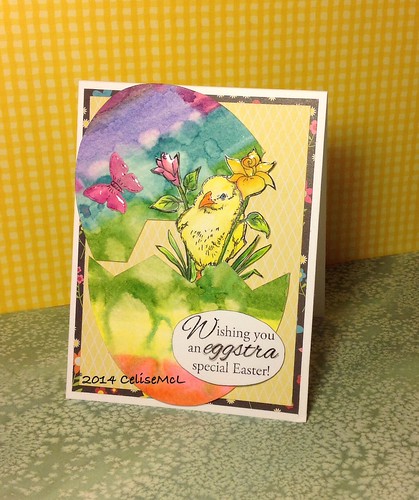
I found this cute Impression Obsession rubber stamp D7744 at my local scrap booking store and thought it would be perfect for an Easter card. I stamped it in stazon black on Neenah solar white card stock and used prismacolor pencils with Gamsol to color it in greens and yellows then fussy cut all the way around.

I used mowed lawn and other distress markers on heavy water color paper and soaked it down with a spritzer. I used a heat tool to move the green color around and get good saturation. When it was dry I created an Easter egg on my Silhouette Cameo and cut it out of the water color paper. I used an inky antics rabbit and cart stamp set for the sentiment which I stamped in stazon and cut out like an Easter egg.

To put the card together I used 110 pound Neenah solar white and cut as a top folding card. I layered pattern card stock then adhered the broken egg with foam tape. I also put foam tape on the chick and tucked her inside. With the left over watercolor paper I cut a small butterfly on my Big Kick and adhered it with a small amount of glossy accents. Then I used glossy accents on the flowers, butterfly and beak.


Saturday, March 29, 2014

Pop Up Sweetness

Between traveling and classes I haven't had a lot of "me" creativity time. I attended a three week Clean and Simple one layer card class most of the month and even though I learned and practiced a lot of techniques, I am happy to be able to do a multi layer card for a change.

I started this as a pop-up card and then decided to tie it in to several challenges on my favorite blogs. Lawn Fawn Lawnscaping is into green and yellow so I concentrated on those colors. Art Impressions is looking for "girlie" cards so I dug out my happy sugar and spice girl. Papertake gave me a sketch to follow, Simon Says "work it Wednesday" wants a little Spring and Little Tangles doesn't want us to forget the envelopes. With these ideas in mind, I went to work on this card.


I stamped the Inky Antics spice girl and her sugar bowl twice on Neenah solar white card stock, colored both in greens and yellows with prismacolor pencils. Then fussy cut them out. The pop up THANKS was cut on a sizzix big kick using a spring green cardstock. I adhered it to a top folding yellow card and rounded the corners.

On the front I layered 3 spring patterned cardstock pieces and stamped the sentiment with Hero Arts black ink on a pattern piece then backed it with the same yellow as the card. I adhered the sentiment, spice girl and sugar bowl to a white square with foam squares and drew outline dots with a black micron pen.

On the inside I glued the girl behind the "N" so she pops up with Thanks. I printed and cut the oval with my silhouette cameo and adhered the sugar bowl on top. Since I create all my cards for reuse, I glued a small pocket on the inside bottom to hold a personal note.

Then of course, we cannot forget to stamp a spice girl on the envelope too!

I am entering this card in the following:

  • AI Challenge #132 - "Getting Girly"
  • Little tangles challenge #33 "don't forget the envelope"
  • Papertake sketch #88
  • Simon Says Work it Wednesday SPRING
  • Lawnscaping Yellow and Green


Friday, March 28, 2014

Happy birthday!

Today is Andy and Daffodil's 6th birthday. They began the day as any other, frolicking on the beach. I suspect it will be a day filled with lots of treats. They will truly enjoy the special attention.

Happy 6th birthday kids!


Wednesday, March 26, 2014

Chugging along...

I finally finished day 9 on day 15 of the online card class. I did not have favorable results using a die with my embossing folder. Ended up damaging my embossing folder, would not try that again. Instead I cut a frame with my cameo and used that with another embossing folder, then the gold embossing powder didn't come out so well, so I flipped it over and used the wrong side. Not my best effort. Photo is at bottom.

This next card was several techniques in one. It began with a humming bird stamped in Versamark ink with white embossing powder and also a mask on sticky note paper. I attempted to color it with markers but the area was too small so I opted for distress ink and used the negative area of the mask to color it. With the masks applied, I used the spritzer tool for mist and then embossing paste over a stencil. I finished it off with black ink sentiment and some turquoise hearts stamps.


This was a fun, but oh so messy project. I created a distress border in broken china using a rectangle mask I had created earlier during this class. Then I used a balloon stamp from the February Simon says card kit and stamped the balloons in distress inks creating a mask for the overlay. Each balloon was stamped in Versamark twice. First heated with sticky embossing powder then glitter was applied and pressed. After the second Versamark stamping I used a holographic embossing powder. The balloons had texture and sparkle. Had trouble getting the sparkle off the stamp, but with alcohol and elbow grease it finally came off. The greeting was done in black then used several little stamps in multiple colors for the graffiti. The strings were done with black micro pen freehand. This was truly a one layer card. Clean and simple? No so much.


Dry embossed with attitude


Sunday, March 23, 2014

Creative Coloring

I am still catching up on the Clean And Simple 3 online card class. Lucky for me, the 10 day class spans 18 days so the 8 days I spent away did not hurt me that much.

Today I finished up the foreground /background lessons and moved into creative coloring. Since I had watched all the videos while I was away, I was looking forward to trying these particular techniques. The card on the left was created using dies on my Sizzix to create the negative space on a card. I used Marvy water color markers in a rainbow pattern on vellum and adhered it to the back. I LOVE the way this card turned out and it took so little effort.


I am getting the hang of clean and simple, even getting braver the more practice I get.


I really like the example for this card, but my coloring did not do it justice. First, I don't have a gold gel pen so I had to use a ballpoint then I don't have the steadiest hands, so my coloring is wobbly. I did not have Copics, but that did not make a difference, I used Marvy Water color pens instead. Nor did I have a detailed background stamp so I created my own background. The technique is to color only some of the image and leave the outer edges light with lots of white space. I accomplished that, but then I decided to cut the card down and mount it with adhesive to a blue base. Not true CAS but it needed some help.


This next card was free hand painting on water color paper. I had the watercolor paper, but freehand.... I thought not. I took my Simon Says feather die and embossed it onto the paper. That eliminated the need to draw a feather and gave me a good base to paint on.

I used Marvy Aqua blue mixed with water to paint the image. Thinking that a feather in your cap is a good thing, I stamped congratulations with a Fiskars stamp. After outlining the card with a stylus, it still was too plain so I used the Distress spritzer with a few colors to add color and 3 blue gems along the bottom. Ok now I am happy.


Thursday, March 20, 2014

Optical illusions CAS 3

Still playing catch up... Now I am onto optical illusions. I love the scenic card that was created during class, so much so, I went out and bought an Eiffel Tower stamp. This is done with stamped and water color. I used a tree from the Simon Says November 2013 kit and a hero arts bike. The Eiffel Tower is a portion of a postal stamp, I masked off the rest when I stamped. The background trees I drew free hand. I used my Distress marker spritzer for splatter and the sentiment is from The Simon Says January kit.

The Day 3 and 4 lessons on optical illusions was to create frames using masks. These techniques really do make a true one layer card that looks like it has layers.

Thank you is stamped with a fiskars sentiment. The border was created by using Versamark ink on an embossing folder, white powder and watercolor pens. The center was masked with a framelit die cut and outside border was masked with tape.

For this card I created two banners on my silhouette. I used various leaf and flower stamps to get the floral frame then stamped the sentiment in the middle. Then used the wink of Stella for some glitz.

On my silhouette I also cut the heart, rectangle and flourish stencil. I used distress inks for color and stamped the sentiment in hero arts black dye ink.


Balloons!

I spent the last 8 days on the left coast visiting with my daughters and grand daughters. The little ones are 5, 3 & 1 and I love spending time with them, but I don't like the long plane trip and I don't like being away from home for any duration. Anyway, I am home now and happily back in my workshop trying to catch up on my clean and simple 3 class.


I started working on this card the day before I left town and finally got back to it today. The card stock strips looked as though they needed to be re-adhered, so I used modge podge Matt finish and let it dry. When I glued the white surround piece onto the card base, it was backwards! Too late, thus the card below came to be.

I cut a new negative out of white and adhered the balloon inside, placed a border of the same pattern along the edge and stamped the sentiment.


The technique is letterpress, but in this picture you cannot see the images on top of balloon. So it just looks like a pretty birthday card.


Tuesday, March 18, 2014

A slip of the fingers

So, our final night on the west coast, we book a hotel on the bay, 5 minutes from the airport. After 7 days with grand kids, I thought a little adult time would be nice. The last time we stayed at this hotel, it was wonderful. We had a suite over looking the bay and no one was in the hotel. Hello! It was Saturday on Easter weekend.


So we get dropped off at the doorstep and my daughter with her three youngin's drive away... What happens? I am sorry, Mrs McLaughlin, we don't have your reservation, but I do have ONE room for $249. I have a confirmation number. But, oh oh... My reservation was so messed up! My confirmation was for two days ago. I was devastated! How could it have happened? Not only is there no space at the inn, but my reservation has gone by... NO SHOW, paid in full.


I think she was concerned for my health, because she went back and checked with the manager. I had to pay today's rate but they would give me a credit for my screw up. Whew. Had they not had a cancellation for today we would be sleeping in the lobby. Anyway, we have a room and we are going home tomorrow.


I cannot believe I messed this up so badly. I am totally responsible. Horrible feeling... Getting old and unreliable.

Thursday, March 13, 2014

Don't sweat the small stuff

Non stops out of Myrtle Beach are rare. Major airlines must connect either through Charlotte or Atlanta. In our case travel to Oakland CA is not just one connection, but two. The trip we took on March 11th was a whirl wind, as much as one can be with 2 layovers. We had only 40 minutes in each location which is barely enough. The planes on either end of the trip are small and they do not permit any carry on luggage larger than a backpack. Any normal overhead compartment carry ons are stored in cargo with a pink ticket and you have to wait on the ramp for the baggage handler to retrieve them for you. The operative word is "wait" which when you have a limited amount of time for concourse hopping, can't happen.

So we got smart and paid for two suit cases at check in. We were so happy when we got to Atlanta because we had to traverse from one concourse all the way to the farthest international concourse. Why international? Last I knew, Los Angeles was still part of the United States. But the tram went to places underground I had never been and finally stopped. We took the 1/2 mile escalator up to the top hoping to find F2 gate at the beginning, but no, gates were in reverse order, all the way at the other end, we rushed and got in the tail end of the line. Thank goodness for reserved seating.


LAX was not so bad, all of Delta's gates are in the same concourse, we actually had a breather before our zone was called. At last, we arrive and deplane. I dug out my claim check. Standing at the baggage claim we retrieve a big red suitcase, yay. Then... Nothing. The carousel was empty. Oh no. You never need your claim check unless.... The worst happens.

The woman working the evening shift was very nice. She looked up my check code... My bag was still in Atlanta. Really? She asked, can we deliver it to you? Well yeah, I don't want to have to come back to the airport. Incredible, they were so helpful. They gave me a claim check and a toiletry bag courtesy of Delta. Inside the bag was everything I needed to make it though the first night including a T-shirt.

The next morning I found an email from Wheresmybag.com letting me know the bag arrived at 11pm and would be delivered in the morning. By the time we got back after lunch it was sitting on the doorstep. No sweat.


Monday, March 10, 2014

Challenge #32 the inside

Found a new blog the other day called Little Tangles, my favorite card genius, Jennifer McGuire was a guest artist for them. This week's challenge is the inside. Which means you need to carry the theme from the outside to the inside. They also gave away some digital designs. So I thought I would use them on a card. I set the cake digital design up on my silhouette cameo and cut it in pink and white card stocks, then using both the positive and negative pieces I constructed the cake. I used the Eat Cake sentiment in different font and did the same. I decided to use that as the inside and cut a window on a card base with a rectangle die. Then I stamped some additional candles and sentiments and added sequins and gems.


Challenge #32


Saturday, March 8, 2014

Throw nothing away

I finally got my Tim Holtz marker spritz tool. I saw on a video that it works not only with distress markers, but all types of markers. So I decided to do my own testing. It absolutely works best with the distress markers, but I only have three colors, so it was important to me to get it to work with others.

I found that it worked with just about any type of market that fits in the holder. A few sharpies, I had to squeeze in, but they worked too. My Marvy water color pens didn't work too well, which was unfortunate, because I have 48 colors. But eventually I got those to spritz too. The cheapo markers I bought at Walmart were second best probably because they are the juiciest. (Not good for coloring, but great for spritzing. )

When I finished my test, I put the test paper aside to dry. The next morning, I was about to trash it when I realized it would make a cool background. What the hey. So I cut two of the best parts.

This first card was a stencil I got from studi calico, FREE, when I took the stencil class. I used persimmon distress ink on the flower and mowed law on the stem and leaves along with some memento pear tart. Then I took a size 01 micron and drew around the border then stamped the greeting with black stazon. I mounted it to some navy blue textured paper and that to a spring green Bazzill base. Added a few gems and dotted stickles..

This second card I used up the happy birthday ink as shadows, stamped flowers in cantaloupe and morocco then stamped the outlines in black. Added some bamboo leaves colored leaves then outlined those in black. Blue gems and yellow stickle dots. This card was mounted on the same navy blue paper and on a yellow cardstock base.

I was going to throw out the test piece?

Tuesday, March 4, 2014

Uptown


Joann.com had a sale last week, 40% off all the Hero Arts stamping products. So I went to town... Ha ha. This skyline stamp is one of the many items I bought. It is big enough to use as a background, but I decided to use it in the Art Impressions Challenge #130 "sheer perfection". I learned this technique about a month ago for dry embossing on vellum. I stamped the skyline image on velum with stazon black ink. Once it had dried I flipped it over on an embossing pad and used a stylus to color in all the windows and outlines. When I turned it back over the velum had a raised texture. Way cool. I stamped the I'm Missing You sentiment in nautical blue and cut a scalloped border piece from my cameo. Since you need to be careful with adhesives when using velum, I decided to stitch across the top with gray thread onto the dark blue Bazzill cardstock base. I did mount the sentiment with a few strips of sookwang and that helped to position the bottom edge.

As always, let's grab a 2-fer! Two for one. The stamp was still wet with ink after stamping on velum, so rather than waste perfectly good black ink I made another card. After coloring some of the windows with yellow marker, I used some florescent yellow embossing powder on Versamark ink for the sentiment and made it into a layered banner. One stamp, two completely different views. I like it.

Monday, March 3, 2014

Down to the wire

I have been so busy this past week with deadlines, I have not had much time to play. Finally, my work is done and I can get back to my craft.

I am submitting this card for the addicted to CAS challenge this week. I sketched the bear on my silhouette cameo using coloring book page clip art. I used prismacolor pencils and Gamsol to color it then I cut it out with scissors. Funny that I would use a die cut machine to draw and scissors to cut? Seems backwards. Oh well. The baby boy sentiment I also printed on the cameo and colored with pencils. The starry background is from the March Simon Says card kit and the stars came from Studio Calico. I used some glossy accents and an at you spica blue twinkle pen for a little glitz. I only had daughters and my daughters had daughters. Somewhere someone is having a boy and could use this card.